 +86 152 6060 5085
 +86 152 6060 5085
Blog
Catalog
Latest Blog
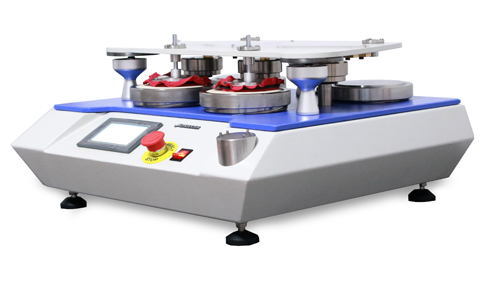
Martindale wear tester adopts the way of rotary wear, used to test the fabric after friction or wear test specimen appearance change, mostly used for automotive interior material testing.During the test, friction is applied on the tangential direction of the rotating sample by friction parts to measure the wear resistance of the sample.
Test steps:
1, clamping sample
Place the cut sample on the test table according to the standard requirements.Keep the sample flat, tighten the compression nut and gasket, and tighten the sample fixing ring with a hex wrench.
2, clamping wear wheel and weight
Install the pre-ground standard wear wheel on the inside front of the balance arm and tighten the screw.Clamp corresponding weight or balance weight according to required pressure.According to the abrasion wheel specifications of different materials tested in the corresponding standard, install the corresponding specifications of the abrasion wheel.
3, the start
Turn on the power switch.Set the preset turn number on the counter.Press the start button and the motor drives the turntable to rotate.
Note: 1. If the grinding wheel is worn to the sticker or the grinding wheel surface is not normal, it needs to be replaced.2. Clean the grinding wheel with a brush before each sample is tested.
Evaluation of sample results
After reaching the predetermined number of turns, the instrument will automatically stop or press the red stop button to stop the test and turn off the vacuum cleaner according to different standards.The sample was taken out for evaluation.
Operation steps:
Preparation before test
Before the test, the instrument should be connected to the power supply, and the exhaust port should be connected to the vacuum cleaner
Accessories and other instruments: a pair of standard grinding wheels, double-sided adhesive (hard), fine sand paper (calibration).According to the requirements of different standards, we also need to prepare 0.1mg precision balance, fabric strength machine, appearance evaluation light box, etc., to evaluate the test results.
Sample: cut to about 110mm, center hole 8mm.If you need to compare the weight change of the sample before and after, you need to weigh the original weight of the sample in advance (such as the sample is the fabric needs double-sided adhesive fixed, need to stick the standard double-sided adhesive after removing the outer sticker, weigh the total weight);To compare the strength changes before and after the sample, it is necessary to test its original strength before the test;Comparison of other properties such as fog should be conducted before the test to determine the original parameters.The sample should be prehumidified for at least 8h.
Speed regulation: after power on, start the instrument under the condition of raising both arms, adjust the speed regulation knob to the required speed according to the digital display.

Email: hello@utstesters.com
Direct: + 86 152 6060 5085
Tel: +86-596-7686689
Web: www.utstesters.com